Replacing windows is one of the more consequential upgrades a homeowner can make, and the process involves more steps than many people anticipate. Understanding what happens at each stage, from the first site assessment through final inspection, helps you make better decisions, avoid unnecessary delays, and evaluate the quality of the work you receive. Whether you are planning a single window replacement project or a whole-home upgrade, knowing what to expect puts you in control.
Window Force has operated as a Canadian vinyl window manufacturer since 2007, producing custom units exclusively to order, which means every window that leaves our 80,000 sq ft Ontario facility is built to the measured dimensions of a specific rough opening, not adjusted on site to fit. The process described in this guide reflects what the replacement sequence looks like from the manufacturing side: what information we need before production can begin, what happens when an order deviates from the original specification, and where installation decisions made on the day affect the performance of a product we spent weeks building to tolerance.
Key Takeaways
- Window replacement follows a consistent sequence: assessment, measurement, product selection, manufacturing, scheduling, installation, and final inspection.
- Hidden damage, such as frame rot or moisture intrusion, is discovered only after the old window is removed and must be addressed before installation proceeds.
- Installation timelines vary significantly depending on the number of windows, custom manufacturing lead times, and site conditions.
- Window replacement costs are shaped by size, frame material, glazing configuration, and labour complexity, not product price alone.
- Proper post-installation checks confirm that a window performs as specified, and skipping them is one of the most common oversights among homeowners.
- Choosing a manufacturer with documented certifications and reliable installation support helps protect long-term window performance.
What Does the Window Replacement Process Look Like From Start to Finish?
Window replacement follows a predictable sequence, though the time required at each stage varies with the project's scope. Understanding the full journey in advance helps homeowners coordinate schedules, prepare their homes, and evaluate contractor proposals with confidence.
Initial Assessment
The process begins with an in-home consultation, during which a qualified representative reviews the existing windows, assesses frame and wall conditions, notes any installation constraints, and discusses the homeowner's priorities regarding ventilation, noise reduction, energy performance, and design. This visit establishes the information needed for accurate measurements, product selection, and project pricing.
Ordering and Lead Times
Once measurements are confirmed and product selections are finalized, the order enters the manufacturing process. For a Canadian manufacturer producing custom-to-order windows, lead times typically range from two to six weeks, depending on order volume and product complexity. Window installation in Ontario, Alberta, and British Columbia follows similar manufacturing timelines, though regional demand peaks in spring and early fall can extend scheduling by one to two weeks. Homeowners should request a written timeline at the time of order confirmation and revisit it if their project date changes.
Installation Day
On the day of installation, the crew begins by protecting the floors and adjacent surfaces, carefully removing old windows to avoid damaging surrounding trim or drywall, and inspecting the rough opening before placing the new unit. Each window is shimmed, levelled, fastened, insulated, and sealed before the installer moves to the next opening. A typical residential installation proceeds at a rate of two to four windows per crew per day, though this varies with window size, accessibility, and opening condition.
Final Walkthrough
After all windows are installed, a qualified installer should walk through each unit with the homeowner to test operation, check lock engagement, confirm seal integrity, review drainage and weep-hole placement, and verify that interior and exterior finishes are clean. This is also the point at which the homeowner receives warranty documentation and installation details.
The final walkthrough is also when the warranty documentation changes hands. A 25-year transferable warranty is only as useful as the homeowner's ability to reference it years later — which means the document needs to name the manufacturer, define what is covered, and specify how to initiate a claim. Window Force warranty documentation is issued at the manufacturer level, not by the installing dealer alone, so the coverage path does not depend on whether the original dealer is still operating when a claim arises a decade after installation.
Windows Near Me
How Do You Know It's Time to Start Replacing Windows in Your House?
Most homeowners delay window replacement longer than is cost-effective because individual warning signs are easy to rationalize. Recognizing a pattern of declining performance across multiple indicators is a more reliable signal than any single symptom.
Comfort Issues
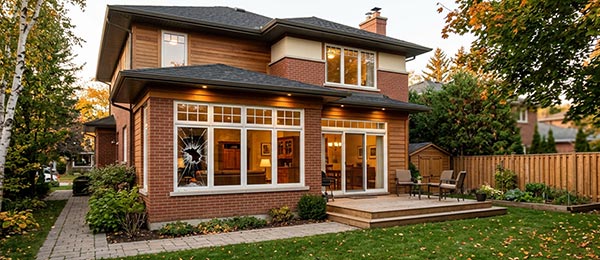
Persistent drafts near window frames, uneven room temperatures on cold days, and condensation forming on the interior glass surface all point to compromised seal integrity or inadequate glazing performance. Condensation between glass panes indicates that the sealed unit has failed and is no longer providing insulating value, regardless of how structurally intact the frame appears.
Visual Damage
Visible deterioration of frame materials, including warping, cracking, soft or discoloured areas, and paint failure along the sill, suggests that moisture has penetrated the assembly. In wood or vinyl frames, these signs are often the surface expression of deeper structural compromise. According to Natural Resources Canada's Keeping the Heat In, windows, doors, and skylights account for up to 25 to 35 percent of residential heat loss. A window showing visible frame damage and degraded sealing may be contributing disproportionately to that figure.
Performance Decline
Difficulty opening or closing a window is rarely a minor inconvenience. It typically signals that the frame has shifted or warped, which in turn compromises weatherstripping contact and airtightness. Rising heating or cooling costs without a change in occupancy or climate conditions, increasing outdoor noise transmission, and hardware that no longer latches securely are all indicators that the window may no longer be performing according to its original design specifications. These are the situations where an in-home assessment from a qualified window professional can help determine the right solution.
What Happens During the First In-Home Window Assessment?
The assessment visit determines the feasibility, scope, and accurate pricing of the project. A thorough assessment protects both the homeowner and the contractor from surprises during installation.
What Gets Measured
The installer measures rough opening dimensions for each window: width, height, and depth. Depth is particularly important for retrofit installations, where the new window must fit within an existing frame. Wall thickness, interior casing profiles, and exterior cladding type are also documented, as these affect which installation method is appropriate and whether additional framing or shimming will be required.
Frame condition is assessed visually and by probing soft spots around the sill and corners. Moisture readings may be taken in homes with a history of water infiltration. The installer also notes any architectural constraints, such as proximity to electrical panels, gas lines, or structural headers, that affect installation sequence or scope.
| Factor | Why It Matters | Effect on Quote |
| Custom sizing | Non-standard window openings require custom manufacturing rather than stock sizes. | Increases product cost |
| Frame condition | Rot, water damage, or structural deterioration may require repair before installation. | Adds labour and material costs |
| Wall depth | Deeper wall assemblies may require extension jambs or additional trim components. | Adds product cost |
| Access difficulty | Upper-storey installations, limited exterior access, or challenging site conditions increase installation complexity. | Increases labour time and cost |
| Number of windows | Larger projects improve scheduling and installation efficiency. | May reduce the per-window cost |
| Glazing specification | Upgrades such as Low-E coatings, gas fills, or triple-pane glass increase manufacturing costs. | Increases product cost |
At Window Force, each product is manufactured to the exact dimensions recorded during the assessment, not to the nearest standard size. Our custom-to-order production model means the window is built to the opening, not the other way around. This reduces the need for excessive shimming and filler materials, which may compromise installation quality if used improperly.
How Should Homeowners Prepare Their Rooms Before Installation Day?
Adequate preparation reduces installation time, protects your belongings, and ensures that the crew can work efficiently and safely. Most preparation can be completed the day before.
Indoor Prep Checklist
- Move furniture at least four feet from each window being replaced. Crews need clear floor access to maneuver old units out and new units in.
- Remove all curtains, blinds, and window treatments, including any hardware attached to the frame or surrounding wall. These cannot remain in place during installation.
- Clear windowsills of plants, decorative items, and electronics.
- Protect flooring with drop cloths if not supplied by the installer, particularly under windows on upper floors where debris may fall.
- Disable any alarm sensors mounted on or near window frames and notify your security provider in advance.
- Keep children and pets away from work areas for the duration of installation.
Outdoor Access Checklist
- Clear a path from the street or driveway to each window, particularly on side or rear elevations.
- Trim back shrubs, garden beds, or tree branches that obstruct exterior access. Crews will not cut back landscaping on site.
- Move outdoor furniture, planters, or equipment away from work zones.
- If the installation requires ladder access along a fence line or deck, confirm that the structure can support the load and notify your installer of any limitations.
How Long Does Replacing Windows in a House Usually Take?

Timeline varies substantially depending on the number of windows, whether the products are standard or custom-manufactured, site conditions, and seasonal scheduling pressures. A realistic timeline plan prevents frustration and allows homeowners to coordinate around the work.
Single-Day Jobs
A straightforward project involving four to six similar-sized windows in accessible locations with clean frames can typically be completed in a single eight-hour day. This assumes the windows have arrived at specification and the crew is experienced with the product line. Weather permitting, the home is left sealed and operational by the end of the day.
Multi-Day Projects
Larger homes with 10 or more windows, or projects involving custom shapes, bay configurations, or extensive framing repairs, routinely take 2 or 3 days. If the installation is sequenced across multiple visits, confirm in advance which openings will be sealed and weather-protected at the end of each day. No opening should be left unprotected overnight.
What Can Cause Delays
The most common sources of delay are unexpected structural conditions discovered once old windows are removed, product damage discovered during delivery inspection, and weather that prevents exterior sealing work from curing properly. A secondary but significant source of delay is waiting for homeowner approval: if the homeowner is not present or reachable when a change order requires sign-off, work stops. Establish a clear communication protocol with your contractor before work begins.
What Installation Problems Can Appear Once the Old Window is Removed?
Removing an old window exposes conditions that no pre-installation assessment can fully predict. How these conditions are handled reveals the contractor's quality and professionalism.
Hidden Damage
Rot, moisture intrusion, and insect damage are the most commonly discovered hidden conditions. They appear most frequently at the sill plate and lower corners of the frame, where water has pooled or wetted over years of inadequate sealing. In older homes, it is not uncommon to find that previous installations simply sealed over existing damage rather than addressing it.
Uneven or out-of-square rough openings are another common discovery. While minor deviations are managed with shimming, significant structural irregularities require reframing before a window can be installed correctly. Attempting to force a window into a distorted opening compromises both performance and longevity.
Repair Decisions
Any condition that requires work beyond the original scope should be communicated to the homeowner in writing before the repair proceeds. A professional contractor documents the discovered condition with photographs, provides a written change order describing the repair, states the added cost and time, and obtains the homeowner's approval before continuing. Verbal approvals for scope additions are insufficient. Retain copies of all change orders alongside your original contract.
When a rot-damaged rough opening is replaced with a new window, the frame material used for the new unit determines whether the same failure cycle repeats. Lead-free uPVC compounded with UV stabilizers does not absorb moisture, does not rot, and does not transfer the dimensional changes that cause wood frames to slowly open gaps at corners and sill junctions. Fusion-welded corner construction seals off the joint points where most frame-related moisture ingress originates, so the new installation is not simply a replacement for the failed unit but a structural break from the failure mechanism that caused the damage in the first place.
“At our facility, we regularly receive retrofit orders to replace windows in openings where the original frame failed from moisture ingress at the corners. The root cause is almost always the same: a mechanically joined corner that flexed under seasonal thermal cycling and gradually opened a pathway for water. The new wood eventually rotted, just as the old wood did, because the failure mechanism was never addressed. Fusion-welded corners eliminate that joint entirely — the corner becomes a continuous, monolithic part of the profile rather than a point of compression or adhesive that fatigues over time. That’s the structural difference that determines whether a replacement window stays dry for 25 years or begins the same cycle the previous one ran,” notes Sergey Essipov, production engineer with 20 years of experience in window manufacturing.
How Do You Choose the Right Replacement Windows for Each Room?
Selecting replacement windows appropriate to each room's function, orientation, and exposure improves both comfort and performance over the life of the installation. A single product applied uniformly throughout the home often leads to compromises in the rooms where windows matter most. Homeowners still deciding on window style can review the full range of residential window types alongside the room-specific guidance below.
Bedrooms
Bedrooms benefit from windows that provide good ventilation control and effective noise attenuation. Casement and awning configurations offer tighter compression seals than sliders, which matters for both winter thermal comfort and noise reduction if the bedroom faces a street. For rooms that serve as egress routes, minimum opening dimensions required by provincial building codes must be confirmed at the selection stage, not the installation stage.
Kitchens and Bathrooms
High-moisture rooms require windows with robust drainage design and glazing specifications that resist interior condensation. Awning windows are often preferred over sash windows because they can remain open in the rain without allowing water ingress. Frame material matters here: vinyl outperforms wood in sustained moisture exposure, and a metal-free spacer system in the insulated glass unit reduces the thermal bridging that promotes condensation along the interior edge.
In high-humidity rooms, the spacer is the component that fails first — not the glass, not the frame. Aluminum spacers create a cold perimeter along the glass edge, promoting condensation exactly where the primary seal is most vulnerable. Window Force uses a metal-free warm-edge spacer design across every IGU we manufacture, which eliminates the aluminum thermal bridge along that perimeter. The practical outcome in a bathroom or kitchen is a warmer interior glass edge and a seal that is not being stressed by the same temperature differential that drives condensation in the first place.
Living Spaces
Main living areas typically prioritize solar gain management, sightlines, and operational flexibility. A window supplier serving Alberta homes in the colder prairie climate may recommend different Low-E coatings than one servicing the milder coastal British Columbia environment. In Canada's colder interior zones, higher solar heat gain coefficients (SHGCs) contribute to passive heating during winter months, while east- and west-facing glazing benefits from lower SHGCs to control summer overheating. These decisions require product-level specification, not just frame style selection.
What Factors Affect the Cost of Replacing Windows in a House?
Understanding window replacement costs requires considering both the product and labour components. A low-priced product with inadequate installation consistently yields a poorer long-term outcome than a moderately priced window installed correctly. The following factors drive the final project cost.
| Cost Driver | Lower Cost Range | Higher Cost Range |
| Frame material | Standard vinyl | Fibreglass or composite |
| Glass configuration | Double-pane with standard Low-E coating | Triple-pane with argon or krypton gas fill |
| Window style | Single-slider or fixed (picture) window | Casement, awning, bay, or bow window |
| Custom sizing | Standard dimensions | Non-standard sizes or specialty-shaped units |
| Colour/finish | Standard white or beige | Custom exterior colours or premium finishes |
Labour Costs
Labour is priced per window or per day, depending on the contractor. Factors that increase labour cost include upper-floor access requiring scaffolding or extended ladders, difficult exterior cladding that must be cut back to allow flashing, structural repairs to the rough opening, and narrow interior access that complicates the removal of large units. Projects with a high concentration of same-size windows in accessible locations cost less per unit than varied or difficult configurations.
Upgrade Costs
Glazing upgrades, including triple-pane units, high-performance Low-E coatings, and gas fills, add to product cost but typically reduce long-term operating costs. For homeowners in colder climates, where heating represents the dominant energy expense, the payback period for glazing upgrades is measurable. The Canada Greener Homes Grant program provides financial incentives for qualifying energy-efficient window installations, which can partially offset upgrade costs. Confirm current program availability and eligibility criteria before budgeting for incentives.
Window Force products are CSA certified and carry ENERGY STAR certification across Canadian climate zones, supporting eligibility for applicable energy-efficiency programs. These certifications help homeowners compare products based on recognized performance standards.
How Can You Tell Whether the New Windows Were Installed Correctly?
Post-installation verification is a homeowner's right and a contractor's professional obligation. A well-installed window is identifiable by a set of observable characteristics that require no specialized tools to assess.
Homeowner Checklist
- Operation: each sash opens, closes, and locks without resistance or misalignment. Casement and awning operators should turn smoothly without binding.
- Gaps and spacing: the reveal between sash and frame should be consistent on all sides. Uneven reveals indicate improper shimming or an out-of-square rough opening that was not corrected.
- Sealing: interior caulking lines should be continuous, uniform, and fully adhered. No gaps or voids should be present at frame-to-wall transitions.
- Insulation: from the interior, no cold air infiltration should be detectable around the frame perimeter. A slow hand-pass around the interior edge on a cold day is a simple field test.
- Drainage: Weep holes on the exterior sill must be unobstructed. Confirm they are clear after installation and not sealed with caulking.
- Hardware: all locking mechanisms should engage fully without force. Multi-point locking systems should consistently compress the sash against the weatherstrip.
When to Raise Concerns
If any of the above checks reveal a deficiency, document it with photographs and raise it with the contractor in writing before the crew leaves the site. Most installation deficiencies can be corrected on the day of installation at no additional cost. Issues raised days or weeks later may result in scheduling delays. If the contractor is unresponsive to documented deficiencies, contact the manufacturer directly. When working with a window company or another authorized dealer network, the manufacturer's warranty and quality assurance process provides a formal escalation path outside the installer relationship.
Engineer Sergey Essipov, with 20 years of experience in window manufacturing, explains:
A window's performance after installation depends equally on the product specification and the installation method. At our facility, we manufacture tight dimensional tolerances precisely because a window that arrives at the correct size eliminates the compensatory shimming that often creates air pathways. Dealers in our authorized network are trained on Window Force-specific installation procedures, which is a direct extension of the product warranty. The two cannot be separated.
How Can New Windows Improve Comfort, Efficiency, and Long-Term Home Value?
The case for window replacement is sometimes framed as a purely financial calculation, but the day-to-day comfort benefits are often more immediately noticeable than the energy savings.
Comfort Gains
Eliminating drafts and reducing the temperature difference between indoor air and interior glass surfaces can make rooms near windows feel noticeably more comfortable during cold weather. High-performance replacement windows help achieve this by reducing heat transfer through the glazing system, maintaining warmer interior glass temperatures, and minimizing air leakage. Features such as triple-pane glazing, Low-E coatings, inert gas fills, warm-edge spacers, and thermally efficient frames all contribute to improved thermal comfort and better overall energy performance.
Efficiency Gains
Thermal improvements translate into measurable reductions in heating load, particularly in Canadian climates, where the length of the heating season amplifies the impact of envelope improvements. Homes with standard-sized window openings and adequate wall depth to accommodate a full-depth installation see the most consistent results. Partial-depth or pocket installations that retain a degraded sub-frame may limit efficiency gains regardless of how advanced the replacement unit is.
Property Value Considerations
Buyers in the Canadian resale market increasingly review window age, condition, and warranty status as part of their assessment. A documented set of recently installed ENERGY STAR-certified windows with a transferable warranty can improve buyer confidence during resale. Unlike cosmetic upgrades, window performance is measurable and can be verified during a home inspection, reducing negotiation uncertainty for both parties.
What Questions Should You Ask Before Hiring a Window Replacement Company?
The selection of a contractor is as consequential as the selection of the product. A well-manufactured window installed incorrectly will underperform; a mediocre product installed with care will exceed the expectations of an equivalent premium product installed poorly.
Questions About the Product
- Is the window manufactured in Canada, and by whom? Can you confirm the manufacturer's certification status and warranty terms directly?
- What climate zones does the product carry ENERGY STAR certification for? Does it meet the zone requirements for your region?
- Is the warranty transferable to a future buyer, and what components does it cover, including the glass unit, frame, hardware, and installation?
Questions About the Labour
- Is the installation crew employed directly, or are they subcontracted? If subcontracted, does the primary contractor remain responsible for warranty claims?
- What installation standard does the crew follow? Ask specifically about air sealing, insulation, and flashing methods.
- Have they installed this specific product line before? Ask for references from projects using the same manufacturer.
Questions About Warranty
- What is the process for filing a warranty claim after installation?
- How long has the company been operating, and what happens to your warranty if the company closes? A manufacturer-backed warranty through an authorized dealer network, as used by Window Force, provides continuity of coverage that a single-company warranty cannot guarantee.
- Is the warranty voided by anything the homeowner does, such as painting the frame or applying film to the glass?
The distinction between a manufacturer-backed warranty and a contractor-issued warranty becomes consequential precisely in the scenario this question is designed to prevent. Window Force has operated continuously since 2007 and provides manufacturer-level warranty coverage through an authorized dealer network, meaning accountability for the product does not rest with the company that installed it but with the organization that designed and built it. CSA certification and ENERGY STAR qualification across all Canadian climate zones are maintained through ongoing third-party audits, not a one-time approval, so the standard behind the warranty is actively verified rather than assumed from a past test result.
Planning, Installing, and Verifying: A Complete Window Replacement Overview
Window replacement is a process with well-defined stages, predictable decision points, and measurable outcomes. Homeowners get the most value from a replacement project when they engage at each stage. This includes asking informed questions during assessment, confirming specifications before ordering, preparing the home, and verifying performance before signing off. Shortcuts at any stage tend to surface later as performance deficiencies or warranty disputes.
Choosing a Canadian manufacturer with documented certifications and an authorized installation network helps reduce the risks associated with any construction project. The combination of ENERGY STAR compliance, CSA certification, and a production model built on custom manufacturing gives homeowners across Canada, whether they are completing window installation in Ontario, commissioning a project in Calgary, or upgrading a coastal home in British Columbia, a consistent baseline of quality and accountability to work from.
Frequently Asked Questions
How much do replacement windows typically cost in Canada?
Total window replacement costs in Canada range from approximately $700 to $1,800 per window installed, depending on size, style, glazing specification, and labour complexity. Custom shapes, triple glazing, and difficult access conditions push costs toward the upper end. Bay and bow configurations carry a higher premium due to structural support requirements and additional framing work.
How long does window replacement take from first contact to completed installation?
From the initial assessment through to completed installation, a typical residential project takes four to eight weeks. Most of that time is manufacturing lead time rather than installation time. The installation itself commonly takes one to two days for an average home.
Can window replacement be done in winter in Canada?
Yes. Experienced Canadian installers complete window replacements year-round. Cold-weather installations require additional care when applying sealants, as caulking and foam products have minimum application temperature requirements. Work is scheduled around precipitation rather than cold temperatures alone, and each opening is secured at the end of each workday, regardless of the season.
What is the difference between a retrofit and a full-frame window installation?
A retrofit (or insert) installation places the new window within the existing frame, which must be in sound condition. A full-frame installation removes the entire frame assembly down to the rough opening and installs a new frame. Full-frame installations are more invasive and costly but allow access to the rough opening for insulation and moisture-barrier improvements, and are required when the existing frame is damaged or structurally compromised.
Does a transferable warranty affect home resale value?
A transferable warranty is documented evidence of product quality and installation accountability that can be passed to the buyer at the time of sale. In a home inspection context, it reduces uncertainty about the remaining serviceable life of the windows and may strengthen a seller's negotiating position. Non-transferable warranties end when ownership changes, which may reduce their value to future buyers.
How do I know if I need repair or full window replacement?
Hardware replacement, weatherstrip renewal, and re-caulking can extend the life of windows if the sealed glass unit and frame structure are sound. Once the sealed unit has failed (with visible condensation between the panes), the glass must be replaced. If the frame shows rot, warping, or significant air infiltration that hardware repairs cannot address, full replacement is more cost-effective than repeated partial repairs.